In the never-ending series of breakdowns at Berlin Airport BER, another mishap occurred in May 2019: 20,000 wrong dowels had to be replaced! However, the fact that wrong dowels can become a real security risk is already evident every day in a large number of households: falling curtain rods, children’s swings and kitchen cupboards make life in your own home a shiver.
DIY and upcycling friends, take note: Here are ideas for building your own furniture. (Scroll down to the article.)
How do you use dowels correctly? The 9 most common mistakes in reasoning on this topic – and what you can do if there are problems – you can find out here.
 © Wikepedia / Juandev / CC BY-SA 3.0
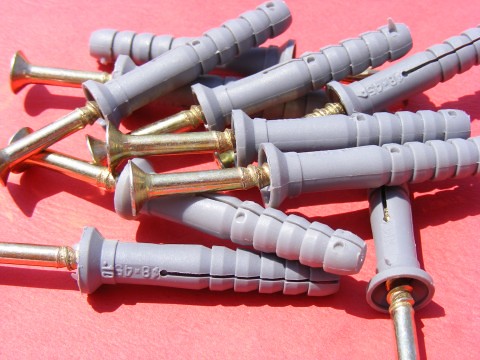
1. Misconception: Always use the dowels supplied.
Dowels that come with a newly purchased piece of furniture are not necessarily the first choice: On the one hand, they are often of poor quality. On the other hand, dowels always have to match the respective substrate in which they are supposed to hold. Anyone who blindly uses standard anchors can experience a nasty surprise.
| Note: You will find an overview of which anchor is the right one for which substrate and which purpose at the end of this article. |

2. Misconception: Universal dowels are suitable for everything.
Many households have a small supply of universal plugs. This is also sufficient to hang up pictures or a coat hook. But even with curtain rods, towel rails or heavier loads, universal dowels are not necessarily ideal, depending on the surface.

3. Mistake in thinking: Do not use a test hole.
For a strong hold of the anchor you have to know the subsurface exactly. First, knock the wall or ceiling. So you can hear whether it is a solid underground or a cavity wall. In addition, a test drilling is useful. To do this, take a thin drill and examine the drilling dust:
- Concrete: The dust is light gray, fine and trickling.
- Aerated concrete: the dust is light gray and coarse-grained.
- Sandstone: The dust is yellow and coarse-grained.
- Brick: The dust is red or yellow, in old buildings it is often black.
- Plasterboard: The dust is white to light gray and sticks to the drill. In addition, the drill dips very easily into the material.
4. Misconception: The drill must fit the dowel exactly.
As a rule, the sentence is correct: You choose the drill with the size of the dowel. But not if the surface is porous! Then you should first pre-drill with a smaller drill and – if necessary – only then rework with the appropriate drill. The reason for this is that with porous walls around the drill, some material always tears out.

5. Misconception: Correct the borehole.
Make sure to drill continuously at a 90 ° angle. If you correct the approach angle while drilling, the anchor will not have a hold later.
Tip: If the drill hole has accidentally become too big or if the dowel rotates in the porous substrate, you can use lightning cement, repair putty or assembly adhesive to help. Fill in the drill hole, push the dowel in and let everything dry. However, the resilience of this procedure has its limits.
6. Misconception: Cut off protruding dowels.
Basically: The drill hole should be about 1 cm longer than the dowel. It is possible to shorten protruding plastic anchors, but this limits the load-bearing capacity of the anchor.
Tip: If shortening the dowel cannot be avoided, you should also fix it with lightning cement or something similar.
7. Misconception: choose screws the size of the dowel.
If the screw is too narrow, it will slip out of the dowel. If it is too wide, it will destroy the dowel. Screws that are too short or that are screwed in at an angle can also endanger the load-bearing capacity of the anchor.
Choose the screw so that it is slightly longer than the dowel plus the component to be screwed on. In addition, the diameter of the screw should be 1 to 2 numbers smaller than that of the dowel:
- Dowel diameter: 6 mm → screw diameter: 4–5 mm
- Dowel diameter: 8 mm → screw diameter: 4.5–6 mm
- Dowel diameter: 10 mm → screw diameter: 6–8 mm
8. Mistake in thinking: ignoring voids.
With thin ceilings and walls, the dowel must be carefully selected depending on the substrate and load. In principle, universal dowels are designed for cavities – but only for solid substrates and low loads.
Tip: In old buildings there is usually a supporting structure made of wood behind the suspended ceiling, which can be found by tapping on it. Light items such as lamps, hanging baskets or Advent wreaths can be easily attached to this support structure. Otherwise, it is best to use spring folding anchors or cavity anchors. These are designed in such a way that they open in the hollow chamber and press against the substrate from behind.

9. Mistake in thinking: Don’t distribute the burden.
The deeper a dowel is in the wall, the more stress it can withstand. A long-shaft dowel is therefore recommended even for towel rails. Especially with walls made of plasterboard, but also with porous substrates, the load must also be distributed over the surface. It is best to use a hanging rail for wall units, which is attached to the wall with as many dowels as possible.
Not all walls are the same and not all dowels are the same. Before disaster strikes in your apartment, you should take a moment to find the right anchor for your project.
How do I find the right anchor?

Safety first! This rule applies even more to the household. So do not be careless when handling dowels, but make sure that the substrate, load and type of dowel fit together.
You can find great DIY tricks for minor household repairs in the following articles:
Source: build, house journal, praxistipps.focus, theo-screw
Thumbnail: © Wikepedia / Juandev / CC BY-SA 3.0
